Friday, November 22, 2013

Updated Asuka Matsuri Cosplay

Here are updated photos of my Asuka Festival/Matsuri Cosplay I made. I finally got some pictures with my friend who cosplayed as Rei :)

Don't mind the little safety pin...I had trouble folding up the yukata to the desired length because I was in a hurry -_-


Although this cosplay wasn't EXTREMELY difficult to make (the sewing portion was pretty straightforward), it still took considerable amounts of time. I spent many hours researching kimonos and yukatas and all of the accessories to ensure accuracy. I am still very happy with this because I made 97% including the plug clips. I did not make the fan or shoes from scratch (though they were heavily modified)

All photos thanks to WhenWasThisTaken Photography

Wednesday, September 11, 2013

Karneval Tsukumo Cosplay

I haven't posted on this blog in a whiiiile. The reason being that I started a Facebook page for my cosplays, so any updates are usually posted there. I'm terrible at using social networks so I seem to allocate time into only one. My page is called JSCosplay if anyone is interested in supporting me there.

In the meantime I'll post some progress photos of my Tsukumo cosplay. I haven't read all of the manga but I watched the anime series. It's not the best show ever but it kept me entertained and I really liked some of the characters like Yogi, Tsukumo, and the Usagi.

For the corset I decided to buy one online and modify the fit/color. I'm not super happy with the paint colors but I'm getting over it

I bought SO MUCH GLITTER RIBBON AND ELASTIC I thought my head was going to implode. It's been very difficult to be 100% accurate to the manga cover because some details haven't looked good in real life and some parts are unclear/cut off:


I altered her headband and skirt so far. Here's how I made those flower armbands


Tuesday, July 23, 2013

Asuka Festival Cosplay 2.0

Okay I've finally found some time to update this journal. So I previously made an Asuka festival cosplay, but decided to tear it apart and make a new one. The reason for this is because I spent a lot of time researching kimonos and yukatas and wanted to make it the right way. In a previous post I had a top and skirt, but in my final piece it is a shortened yukata.


I made it longer than necessary so I could fold it up to the desired length like you would on a kimono. I made the obi out of fabric and very stiff interface. I decided to shortcut the obi method and made a Velcro closure in the back (as opposed to the normal length of an obi which is much longer). I used a tail key chain I had laying around. It's not completely accurate to the reference but it still looked cute. The bow was made extra large and supported by wires. I also made a pillow-like cushion for added support, and because I saw a peek of one in the reference figure.

Here is a picture of the eri sugata I made:

It has interface on the inside for stiffness. I sewed elastic to the ends and to the back piece so that I could wrap it around and tie it below the bust.

I also made her plug clips. I started with an aluminum foil ball, then covered it in red Sculpey. I carved the black detail with the end of a paintbrush, and baked it with the hair clip on the bottom.


This is after they were baked, sanded, painted, and varnished.

I couldn't find any tabi socks that matched the color of the yukata, so I made some. These are made from a stretch cotton jersey:


The finished look courtesy of WinterWish cosplay photography:

Note to self: look into getting a new wig and fix makeup -_-

Sunday, April 21, 2013

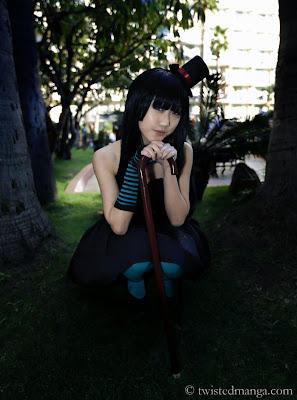
K-On! Mio Cosplay

Here are some photos of my Mio cosplay that I wore at a few events including Anime Los Angeles 2013. It was really fun to wear because it was so comfortable. I tried to stay true to Mio's outfit as much as possible, though I probably should have cut off the excess ribbon behind her hat.

The hat was probably the most challenging thing I made. I bought the tights/arm warmer from www.welovecolors.com. They have a lot of useful things for cosplaying in terms of gloves, tights, etc because they have a standard color chart. The cane was bought from an old folks store. I think it was called Vitality Medical. Good to know my cane is also functional!

Here's a photo of my makeup. I really like these circle lenses because the gray really showed. 

I was also fortunate enough to meet two people from TwistedManga.com that took a picture of me and also included me in their ALA 2013 video. Very nice people (:


Here is their awesome video:


Monday, March 11, 2013

Blog Reunion

It's been almost a full year since my last post. School is INSANE. I also didn't realize the amount of work it takes to keep up a blog..I give props to people who make the time to do it!

So I've been meaning to post up my Wendy Marvell from Fairy Tail cosplay. What was thought of as a simple dress turned out to be excruciating. I almost gave up many times. I'll document a picture of all the components when I get the chance. I'm really happy with how her wing accessories turned out. They had the perfect shape of Wendy's in the anime.

Here's a photo I took with a friend cosplaying as Ahri by Patrick.